Sunday, June 26, 2016

Sponge Technique Video + Butterfly Card Printable


This weekend continues to find me working on changing my craft room into a nursery.  It's kind of slow go...the window is being repaired right now and I can't paint until that is done.  Our house is 107 years old - it has gorgeous arched wood windows, but they need TLC after that long!  

I've also been creating, of course!  


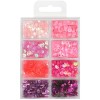
I discovered a cool technique using ink pads and makeup sponges on pinterest.  Then I saw THIS card by Mariana Grigsby and was inspired to give it a try.  Ink sponging is fast, easy and pretty!  I put together a video - you can watch it here:


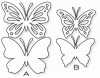
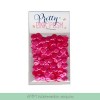
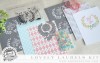
I also have a pretty butterfly card printable.  You can just print, cut and fold and it's pretty enough or...


you can stack the butterflies (provided in the download) to dress it up even more.  Then I added a sentiment at the bottom in gold embossing powder.


Check out these cute cards from my blog friends!

THIS card is by Lisa using one of my kitty flair:


and THIS pocket letter by Kitty using my "You're My Cup of Tea" printable:


Thank you for sharing these with me!  

What have you been doing this weekend?  Major project, fun project?  Hope it's been great and have a wonderful week, too!

Sunday, June 19, 2016

Baby Deer Card Printables


Oh my gosh, it has been super hot around here!   All ready!  It's not even quite summer yet.  I'm just a wimp about heat - I think I could live in the Arctic!  Well, I've certainly been staying inside, whipping up a few creative things.  I've got a couple of baby cards today.  


First up is this fun shaker card.  I decided I needed to actually use a couple of stamp sets that I've had for awhile, but hadn't even opened.  


Instead of just sequins, I've got some prills in there - they look like little tiny beads.  Very cute and they make a lot of fun noise when the card is shook.


This Deer So Sweet is a printable.  I took an old card and cleaned it up and added pink or mint watercolor stripes behind the deer and for the back of the card.  You can download both colors below.  


Isn't that deer just adorable?   The printables include a couple of bonus sentiments, too!

I made this card because I needed a thank you card.  Now, WHY you may ask?  Why would I need a thank you for a baby gift?

NEWSFLASH:  I'm going to be a grandma in late October or early November!!  A grandma to a little girl!  Exciting, right???

Okay, back to the deer printables.  


I designed the cards to have a white frame around the vintage image.  These are some cutting tips to make that really easy to accomplish.  

Just cut right along the sides using the watercolor stripes as the guide.

Score above the vintage image to make the fold - leave about the same white space above as  on the sides.

Cut the bottom about the same distance from the vintage image, as well.


You can download the pink version HERE and the mint version HERE.  When the image comes up, wait just a second and the download button will appear in the top right corner.

Do you need to stay out of the heat, too?  Maybe you need to make a quick, cute baby card or two?

Have a wonderful week - see you again soon!


Sunday, June 12, 2016

Patriotic Ornament + Cute Vintage Image


July the 4th is on its way.  Our neighborhood started a parade for the little kids - they are so cute riding on their decorated bikes and wagons!   I like to decorate my house with little pieces here and there and also put a couple of pieces in my office.  This ornament is perfect for that!  It hits all my sweet and cute requirements.


This is actually pretty quick to put together.  I've got the circle piece with those cute little boys and their sweet dog ready for you to print.  I've included two circles in case you want to pop up the images like I did.  You can find the ornaments I used HERE.  (Couldn't get the picture to work for the list below.)


There are a lot of dies out there that will work for these plastic ornaments.  You may have a set of circle dies or scallop dies that would certainly work.  I wasn't quite happy with this one and added some punched holes all the way around before I glittered it up.


Next, just stack up the pieces, popping up the boys and dog if you wish.  I glued three red mini stars in the background and added some metallic star confetti.  Be sure to glue the ornament half with the open tab at the top so you can tie on the hanger.  I used Aleene's  - just running the glue along the bottom of the plastic ornament.  I just can't do it neatly enough with hot glue.


I wrapped the ornament with a silver chenille stem (actually it took a little bit of second one as well).  For that I did use hot glue, but not all the way around, just at the top, each side and the bottom.


For the decoration at the top, I glued on a couple of bows and then clipped on a further decorated clothespin.


You can download the patriotic marching boys HERE.  When you get to the image, wait just a moment and the download button will appear in the upper right corner.

So glad you came by - have a wonderful week!


Related Posts with Thumbnails