Wednesday, October 28, 2015

Butterfly Envelopes


This is an oldie, but goodie - turning envelopes into treat bags.  I found these really cool Seventies envelopes at a flea market.  (It was more flea than market, but I did come away with some great stuff!)  Don't you love the orange and hot pink?

It couldn't be easier to turn your envelopes into a quick gift bag - perfect for a little treat or gift card - maybe both?


Seal the envelope (I use glue, instead of just licking it - want to make sure it stays sealed).


Then cut open one end - you can use pinking shears or decorative scissors.

Now what?  Just decorate!


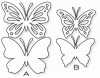
This one already has some fun flowers.  I pinked across the top, clipped on a pretty butterfly and glued in a white doily on the inside.  Love it!


This one is a plain white envelope.  I wrapped wide washi tape around the bottom.  Holes are punched across the top and threaded with twine.  It got a pretty butterfly, too!

Need a quick gift bag?  Try an envelope!

Hope you're having a lovely week.  Happy you came by!


Thursday, October 22, 2015

Baby + Stork


There's probably not anything sweeter than a baby.  I really enjoy making baby cards, but don't seem to do it that often.  This one was a request for a baby shower.


Not being sure what the baby is going to be, I opted for yellow.    I love this stamp!  It's really large and makes quite an impression.  It's from Woodware and I've got a couple left in my store.    I hand wrote Special Delivery and just dotted in the sky with a Copic marker.

I'm off tomorrow and need to do a couple of technique videos for Cut Out + Keep.  I'm looking forward to being a part of their Technique Tuesday program.

Have a wonderful weekend and thanks for stopping by!


Friday, October 16, 2015

Paper Pumpkins + TV Experience!


Guess what?????  I was on TV yesterday morning!  YES, me!  Are you wondering why? 

 Promise - it wasn't a mug shot.  I got to do a craft segment on our local Rise and Shine morning program!

Out of the blue, I got an email from Sweeney PR Firm asking me if I would like to do a fall craft TV segment for JoAnn Fabric and Craft Stores.  At first, I thought "Yeah, right."  But I googled the firm and the person and they seemed legit.  Called and talked to a lovely lady who said they found me through my blog.  Fast forward a couple more days and I actually did it - LIVE!  I keep hoping they'll get the segment posted, when (and if) they do, I'll link to it for you to see.

It was a 5 minute segment, so the project had to be easy.  And, of course, I wanted it to be cute.  Answer:  Paper pumpkins, sweet and cute paper pumpkins.


These are so easy I've even done them with first graders.  You've probably made a paper chain and that's what these are, but instead of linked together, they are wrapped around each other.

Here's how:


For the large pumpkin, cut 4 strips 1 1/2" x 12.  For the medium pumpkin:  1" x 10 1/2.  For the small pumpkin:  1" x 9 1/2.


Place the ball on the strip diagonally.  Place it so that the open spaces align with the strip.


Add a stem and decoration.  These stems are made with wooden spools.  You could use corks, too.

Have a wonderful weekend!

Friday, October 9, 2015

Easy Halloween Lollipop Covers + Free Image


Stopping in today to show a really easy Halloween idea.  I'm getting ready for one of my show and sales on Sunday and I am super super busy!  I show Halloween, Thanksgiving and Christmas so ever spare moment is spent creating.

What's underneath those black cat images?  Orange Dum-Dums!   

Super easy to make:  

1. Download cat images below.
2.  Die cut circles.
3.  Glue circles together.  
4.  Glue to lollipop.  (I used a couple of glue dots and some Aleene's.)
5.  Tie on ribbon.

I was going to say as easy as 1 - 2 - 3.  But I guess it's as easy as 1 - 5.


Download black cats HERE.

If you downloaded the cute Black Cat Treat Box, these would work perfectly as part of the treats.

Update on Challenge:  You may have seen in the last post, that I couldn't tell who won.  I didn't know that "Pos #1" meant winner.   I just found that out today.   Pos #1 is Lisa Minkler!  Lisa did you get an email???

Happy October!

Sunday, October 4, 2015

Candy Corn Jar


Hi, everybody!  How's your weekend been?  Mine has been lovely...having fun creating and enjoying the cooler weather.  We've had a little taste of fall.

Thank you to everyone who participated in Challenge #1!  It is now closed.
Okay, I have a confession:  I have no idea how to tell who won!   How embarrassing.   I thought I set it up for Inlinkz to random select a winner, but I can't tell if that it happened.  So...I just emailed them and hopefully, I'll know something soon.  But, it was awesome to have so many of you link up - I got to see the most wonderful fall projects.  I've still got a few of you to visit.  I will get there soon!

How about a quick, cute little project idea?


I love the colors of candy corn and even though I don't really want to eat a lot of them (one or two does it for me),they still make me smile!

Let me give you a few tips I figured out while putting this together:  

You want the top to be somewhat sturdy.  It's a little hard to see but I've got a black scallop circle out of 100 lb cardstock under the top tag.  The double layer of cardstock really helps it sit on top of the jar just right.  

Then you want to scrunch the cupcake wrapper tight around the top of the jar.  

The last tip is to twist your ribbon to make it thinner.  I had a hard time tying the ribbon around the cupcake wrapper,  But when I figured out to make the ribbon thinner, it tied around the cupcake wrapper much easier.  The other thing you can do is to put a little bit of glue on the opposite side of where the ribbon is going to be to hold the ribbon on.


The candy corn image I used to create my tag is a freebie.  You can find it HERE.

Well, hopefully I'll find out who won the gift certificate for Challenge #1 soon!  Thank you for your patience with me while I work through my Linky ignorance!  

Have a lovely week!


Related Posts with Thumbnails