Friday, July 31, 2015

Paper Sweeties Birthday Hop

Welcome to Paper Sweeties Third Birthday Blog Hop!   My goodness, three years already - where does the time go?  It does go by fast when you're having fun!  Congratulations, Debbie on a fun three years!


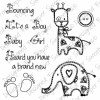
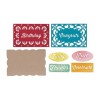
Since we're celebrating a birthday, I went with a Birth Day theme and used the Bouncing Baby stamp set.  Isn't that giraffe adorable?  

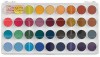
I used the colors in Paper Sweeties August Challenge:


Pretty colors, right?  You might want to play along!  Visit the Paper Sweeties Blog for all the information.


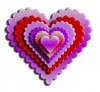
My card features a flat shaker element.  I really like it as an alternative to the bulk that a normal shaker piece can add.    In the video below, I show you how to make it and give a couple of tips about the sequins, too.


Of course, you're looking the the star of this card - that sweetie pie giraffe!  I had such fun watercoloring it and you can see the process in the video.  I'm a newbie at watercolor, so learn along with me!

Hope you enjoy the video:


Join in Paper Sweeties Birthday Party!


Visit Paper Sweeties to get all the details and the entire list of birthday hop blogs.  Join me in visiting them all - I don't want to miss a one!


Sunday, July 26, 2015

A Pretty Way to Say Hello + Free Image


"To send a letter is a good way to go somewhere without moving anything but your heart." - Phyllis Theroux

Gotta love email, right?  Sometimes there are some awesome things in my inbox.   But do you miss the fun of running to the mailbox and opening real mail?  Especially pretty mail?  


I had someone tell me the other day that the biggest reason they buy cards from me is because of the reaction they get from the people they give them to.  I totally love that:  I can make three people happy with one card (me, the person who gives it and the person who gets it).  

Confession time:  Yes, this card makes me happy, but I dropped water on her totally by accident.  Sloppy drinking out of my water bottle, I guess.   I didn't even realize it until it was already dry and some of the ink had disappeared.   I decided just to go with it and dribbled more water on her.   Kind of like the dots - happy accident!


If you would like to create some happy mail with this pretty girl, you can download her HERE.


Make someone's day and send your heart with some pretty happy mail!

Have a lovely week...


Monday, July 20, 2015

PaperDoll FUN + Free Images!


Keren (Free Pretty Things for You) and I are bringing you a darling vintage Paper Doll image along with her clothes!  I was lucky enough to score this paper doll and her clothes not too long ago.  Keren changed up the clothes' colors, so we've got the original set plus the new set available for you.  The paper doll's in great shape - the only thing is that some sweet little girl wrote her name on the front of her slip - but that just makes her all the better!  

I'm always drawn to paper dolls because my mom loves them.  One of her favorite things was playing with paper dolls.  I made one of these projects specifically with Mom in mind.  

First up, is the card featuring her oh, so sweet pink dress:


I fell in love with the kitty buttons and had to have them.  (You can find them HERE.)  Hard to tell in the photo, but her dress is attached to her by only the tabs on her back, so it looks like someone just slipped on her dress.

Now, this is for my mom:


She's just a little "sweet nothing" for mom to set on her desk to enjoy.  I've got some tips for you if you'd like to make something similar:


Print paper doll at 5".  Now, you want her to be VERY sturdy.  You could print 3 more of her, cut them out and stack them.  What I did was trace her onto scrap 110 lb cardstock.  The base will also need to be sturdy.  I used three 110 lb circles.


Glue two of her layers to her and save the third one.  Make the stand from sturdy cardstock.  The base isn't quite 1 1/4" across - it's the width of her feet.  Glue her feet about 3/4" down on the stand.


Score the stand underneath her feet and cut to fit her legs.  Glue the last layer on the back of the paper doll covering the stand.  

Then make the slits as indicated above.  The stand will slip into the slit base.  Start with 1 1/4", you made need to make it a little longer.  Tip:  Angle the corners of the stand to easily slip into the slit.  Glue the other two base circles covering the stand.  


One last thing to make sure she stands steady on her base:  Put a little bit of hot glue under the tips of her shoes and hold them in place until dry.  Before you add the hot glue, make all the changes to the paper doll that you want to do.  For example, tie the ribbon around her waist and add button, etc...  That way you won't tear the hot glue from the paper while you work.  (Yeah, I did that!)  You could stop right here (see top picture) or you can go on to adding other embellishments and placing her on a block or large spool.   (If you would like to do a rosette and don't know how - just go to YouTube, you'll find lots of videos.)

Okay, I'm trusting you to be gentle with me on this next one!


I hand lettered the sentiment!  Yes, it has a couple of "oops!" places. but it was FUN!  I watercolored the background and the hearts.  (Inspired by Lori at Elvie Studio.)


Download Paper Doll with Original Clothes HERE.

Visit Free Pretty Things for You to download Paper Doll with New Clothes.

Have fun creating with this darling paper doll.  So glad you stopped by and have a wonderful week!


Wednesday, July 15, 2015

Hello Lovely!


Hello, Lovelies!  I'm having fun again with my Minc!  Can't seem to stay away from the gold foil.  Must love the shine...


This Hello Lovely card was part of the All About the Gold Choux Box Kit.   If you're interested in the next Choux Box Kit offering, click on the the Choux Box Kit Club link at the top of the page.


You can download the Hello Lovely page HERE.   These are lovely in black and white - you can enjoy them without a Minc!

Well, Hump Day is almost over and we're on the fast track to the weekend.  Looking forward to tomorrow evening first, though.  We're going to see the Faberge exhibit at the museum.  I hear it's lovely.  (Couldn't resist!)

Okay, just one more:   Have a lovely rest of your week!  Have you got anything fun planned?

Sunday, July 12, 2015

Party Kitty Shaker and Wand (Free Image, too)!


Warning:  Cute and sweet all over the place!  This kitty is adorable!  Just perfect for a birthday greeting or party favor.  Don't you think?  


Is it just me?  I always have trouble with shaker cards.  With this one, I wanted the confetti to stay to the right of the kitty.  What use is having cute confetti if all disappears behind the kitty, right?  Could I glue it all?  No, I decided there was no way.  (I did glue the blue star sequin, however, I wanted it RIGHT THERE!  Here's what I actually did:


I sprinkled confetti onto the blue and white background.  Stacked a piece of transparency on top of that and then the yellow gingham.  Then I VERY CAREFULLY took it over to the sewing machine and stitched what you see above.  It seems to have worked!  


Don't you want to have a party?  This would make darling cupcake toppers, too!

Here are the steps for the kitty wand:


Print and cut out the adorable kitty.  You might notice that the circles are the trash  negative space from making the shaker card.  Tie a ribbon around the straw and make the fringe.


I usually just glue the layers down the middle - you can sew it, too.  I really like the look of pinking the fringe.


I use Aleene's glue - hot glue works, too.


Let it dry a little and fluff it up - just scrunch it!  I also added a flag at the top and clipped it to a bag with a paper clip.  


Download the adorable kitty HERE.

I can't believe it's already July 12th!  How many days until Christmas?

Hope you are having a wonderful Sunday!


Tuesday, July 7, 2015

Tags for Download: Minc (or not)!


We're having a weird kind of day today - a high in the 70s in July!   That hardly ever happens.  That's pretty amazing, but it's still really humid.  Every hair on my head is about 4 times thicker than normal and the gray ones are really crazy!  I've gotten to where I just have to say "Oh, well...."


I picked up some great tags at Michaels the other day - all pretty, gold and shiny.   They inspired this card and the tags I have for download below.  Now this card has something really cool, besides all the  pretty gold.


It's front is a die cut panel!  I love how it's see through.


Let me give you a tip that I figured out the HARD way:  Give yourself 1/4 to 1/2" to work with at the fold.  It is REALLY hard to fold over 1/8"!

To figure out what size card base you need measure your die cut panel and add 1/4 to 1/2" to the length.  Example:  This die cut panel is 4" x 5 1/4".  The card base before trimming needs to be 4" x 5 1/2 or 5 3/4".  Score it at 5 1/4" from the bottom.  You want the base to be the same size as the die cut panel.  Fold over the extra and then trim the fold piece to about 1/8" (or the width of the frame of your die cut panel) and glue.


Okay, let's have a little more fun with tags!  You can download these HERE.

They are great for foiling with a Minc machine or printing them on different colored cardstock.

Here I printed them on yellow:


Love this paper. I think I've had it about ten years!  I so wish I knew where I got this from.  It's about 20 inches wide and came on a roll.  It is a lovely weight and texture.  It would be nice to see what they have now.  

You can see how to make a gusseted bag on THIS POST.


I also foiled all of the tags in gold, pink and teal.


Just went really simple with this.  So hard to photograph the pretty shine!  

Hope you're having a wonderful week whatever the weather is where you are!


Related Posts with Thumbnails