Sunday, January 24, 2016

Hugs and Kisses Doodle Heart Printable


Have you had a lovely weekend?  I've spent most of mine creating some new goodies.  Dennis worked on Saturday, so I had most of the day to play.


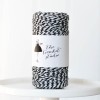
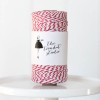
It's hard to beat Hugs and Kisses for Valentines.  Candy and the real kind!  

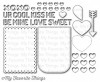
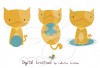
To make the tag, I printed the hearts twice.  Once on white cardstock and once on gingham paper.


I cut out the Hugs and Kisses part and layered it on top of the white cardstock heart.   You could print them out on solid colored cardstock or even color them if you print them on white.


You can download the Hugs and Kisses Doodle Heart HERE.

Don't forget the Valentines/Hearts Challenge is still open.  Link up your Valentines and/or Heart Projects HERE.  

Happy Hugs and Kisses!!


Sunday, January 17, 2016

How to Make A (Super Easy) Paper Daisy!


I love paper flowers!  I have a vintage book from Dennison and also a new book full of paper flower how-tos.  It seems like I never have enough time to sit down and actually make any of them.  When I decided on a daisy sucker cover for this project, I looked through both of them.  The daisies are so very pretty, but kind of time consuming.   I was whining (I mean mentioning, of course) about it to Dennis and he remembered making these easy daisies in school.  Seriously???   I don't have a memory like that.  I remember very little about grade school and if I even remembered making a daisy, I wouldn't have a clue how we actually did it!

So are you wondering how to make the daisy?  Here's a video to show just how easy it is:


You could make a bunch of these daisies in no time.  You can make even bigger daisies than I show in the video.  Just use a larger rectangle.   I give a couple of tips in the video if you want to use the daisy as a sucker cover like I did.


If you're like me, you probably think the vintage valentine is really sweet.  I've got it for you to download below.  (The sentiment, too!) 


Valentine Kits became available today.  The I Pick You Treat Box is one of them.  If you would like to see all the kits, click on the Choux Box Kits Club Link at the top of the page and sign up.   When MailChimp notifies me, I'll send you the pictures and info.  You should see the darling Flair Tin PIns! 


You can download the sweet daisy girl valentine and sentiment HERE.


Challenge #3 is now open!  You can get all the info and link your images HERE.

Happy Creating!


Saturday, January 16, 2016

Challenge #3: Valentines/Hearts

It's time for Challenge #3!   Link up your new Valentines and Hearts projects.   Then stay around a minute and comment on other links - it's always nice to get comments!

The prize for this challenge is a $15.00 gift certificate to The Funkie Junkie Boutique, where you'll see plenty to choose from!

Can't wait to see your projects - link away!


Sunday, January 10, 2016

Pom This, Pom That!


Does that need a pom?  Does this need a pom?   I think it does!  Silly, but fun...  Pom poms are adorable!  I've got to make more...


After I created this kitty valentine, I just had to add a yarn pom pom, right?  I tied it around a heart sucker.   Love this kitten from Collective Creation.  What do you think about the pun?


I also added a pom pom to this wonderful door hanger for my teacher friend, Souna.  You might remember the one I made for her for the beginning of school HERE.

A pom pom just made it right cheery, don't you think?  Not that the snowman needs  much help, he's pretty much bright and cheery all on his own!  He's from J&G Design.

Here's a quick tutorial on pom pom making:


I used a fork to make one the right size for the lollipop.  I used four fingers to make the one for the snowman.  


Then start wrapping.  This is about 20 times around.  Keep going...


For the fork size, I wrapped it about 65 times.  For the four finger size, I wrapped it 100 times.  You can just use a piece of the yarn to tie it, in this case I used twine.  I poked through the bottom middle of the fork and up around the back of the yarn and loosely tied it.


Slip it off the fork and tie it TIGHT in a knot.  Cut the loops all the way around.


See how scraggily it is?  Cut and cut and cut and cut and cut some more to turn it into a pom pom!   If you just want the pom, you can cut off the  twine pieces.  I wanted to keep them to tie the pom to the sucker stick.


It takes a lot of trimming to get it into pom pom style!

Stay tuned:  Another challenge starts this coming weekend!

Now, go POM something....


Friday, January 1, 2016

Happy 2016! + Free Image


Wow - here we are - another year gone by!  The years just seem to be flying by.  I guess that's why we need to make the most of them, right?  My goals:  more time with family and more time creating!  (Maybe I should add a weight loss goal in there, too!)


I made this card for Kirby to give to his wife, Gail.  Their first date was on New Year's Eve 40 years ago.   He gives her a card every year and I think I've made them for the last 6 years or so.  Love to be a small part of their celebration.

Have you tried any of the Heidi Swapp Art Screen Ink?  Its a lovely product, you can see how the gold shines.


It's pretty easy to use.  Tape your stencil on top of your paper and swipe on with a palette knife (or something similar).  Gently pull it all off and clean everything with some soap and water.  When it dries, you've got a fun, textured background.


You can download the sweet vintage postcard below.  It might be a little late for this year - but maybe one of your New Year's resolutions is to plan ahead?    Obviously, it needs to be added to my list!  I printed it so the clock would fit the die cut clock.  I printed two and cut out the little girl to pop on the top.  I also used a gold pen to write over the word Resolutions on her scroll so it would show up a little more.


Download the New Year Postcard HERE.

Wishing you all the best in 2016!


Related Posts with Thumbnails