Showing posts with label Free Pretty Things for You. Show all posts

Monday, April 18, 2016

DIY Watercolor Tag Book + Envelope Pocket!


The watercolor craze is full on!   Here's an idea to get your kids (grandkids, friend's kids, any kids) to join in:  a watercolor tag book!  And, of course, you would need a cool gift pocket for it, too.   Karen, from Free Pretty Things for You, and I have teamed up to bring you this free darling vintage graphic just perfect for watercolor fun!


First up, let me tell you about the tag book.  I wanted images that were a little larger than most of my stamps, so I printed digi images on watercolor paper.


You may remember my printer saga with watercolor paper.  I recommend printing on 90lb instead of 140lb, as 140lb killed my printer!


The watercolor paper was trimmed into tag shapes and bound on a book ring.


The gift pocket is made from a business size envelope.  Super easy - here's how:


You can download a couple of versions of "Color the Pictures Kids".  There's one with the little girl in a pink dress and one with the little girl in a teal dress.


You can download the pink dress version HERE.

ETA:  There seems to be some trouble downloading from the above link.  I put it in my dropbox account so I'm hoping it will work.  The link is HERE.  It seems a tiny bit slow, but a download button will pop up on the top right of the screen.  Here's hoping this one works!

Visit Free Pretty Things for You to download the teal dress version.

Cute and fun in one little DIY watercolor package!
So glad you stopped by and have wonderful week...


Monday, July 20, 2015

PaperDoll FUN + Free Images!


Keren (Free Pretty Things for You) and I are bringing you a darling vintage Paper Doll image along with her clothes!  I was lucky enough to score this paper doll and her clothes not too long ago.  Keren changed up the clothes' colors, so we've got the original set plus the new set available for you.  The paper doll's in great shape - the only thing is that some sweet little girl wrote her name on the front of her slip - but that just makes her all the better!  

I'm always drawn to paper dolls because my mom loves them.  One of her favorite things was playing with paper dolls.  I made one of these projects specifically with Mom in mind.  

First up, is the card featuring her oh, so sweet pink dress:


I fell in love with the kitty buttons and had to have them.  (You can find them HERE.)  Hard to tell in the photo, but her dress is attached to her by only the tabs on her back, so it looks like someone just slipped on her dress.

Now, this is for my mom:


She's just a little "sweet nothing" for mom to set on her desk to enjoy.  I've got some tips for you if you'd like to make something similar:


Print paper doll at 5".  Now, you want her to be VERY sturdy.  You could print 3 more of her, cut them out and stack them.  What I did was trace her onto scrap 110 lb cardstock.  The base will also need to be sturdy.  I used three 110 lb circles.


Glue two of her layers to her and save the third one.  Make the stand from sturdy cardstock.  The base isn't quite 1 1/4" across - it's the width of her feet.  Glue her feet about 3/4" down on the stand.


Score the stand underneath her feet and cut to fit her legs.  Glue the last layer on the back of the paper doll covering the stand.  

Then make the slits as indicated above.  The stand will slip into the slit base.  Start with 1 1/4", you made need to make it a little longer.  Tip:  Angle the corners of the stand to easily slip into the slit.  Glue the other two base circles covering the stand.  


One last thing to make sure she stands steady on her base:  Put a little bit of hot glue under the tips of her shoes and hold them in place until dry.  Before you add the hot glue, make all the changes to the paper doll that you want to do.  For example, tie the ribbon around her waist and add button, etc...  That way you won't tear the hot glue from the paper while you work.  (Yeah, I did that!)  You could stop right here (see top picture) or you can go on to adding other embellishments and placing her on a block or large spool.   (If you would like to do a rosette and don't know how - just go to YouTube, you'll find lots of videos.)

Okay, I'm trusting you to be gentle with me on this next one!


I hand lettered the sentiment!  Yes, it has a couple of "oops!" places. but it was FUN!  I watercolored the background and the hearts.  (Inspired by Lori at Elvie Studio.)


Download Paper Doll with Original Clothes HERE.

Visit Free Pretty Things for You to download Paper Doll with New Clothes.

Have fun creating with this darling paper doll.  So glad you stopped by and have a wonderful week!


Monday, April 20, 2015

Little Lambs Eat Ivy


Keren (Free Pretty Things for You) and I are bringing you some sweetness again this month!  You'll want to download this little lamb, because not only is it adorable  - it is versatile.   I confess when I first looked at it, I thought "Easter".  And, of course, it would be perfect for Easter, but it was going to be after Easter before we could post it.  So you can probably already tell the thought process:  in like a lamb, Mary had a little lamb, baa baa black sheep, counting sheep, babies, little lambs eat ivy...    

You can see which one won out for me.  I took the sweet lamb that Keren sent and used it to create a seed packet cover.  Imagine my surprise when I sent my project to her and she replied back that the original image came from a seed packet!!!  Must be fate...


If you download the image I created, you can print it on about any color.  I was going to draw the seed packet template, but personally I can't stand for there to be lines on my projects!  It's actually very easy to score and cut to make the seed packet - all with no lines!  The following instructions will tell you how to make the seed packet.


These instructions are based on where the image prints right from the download.  But if you change the size or position, it's pretty easy to figure out.


Score following the photos above.  Now let's create the tabs.


I designed the packet to open on the right, so it's got a slightly larger tab.


One more step on the tabs:


Now you're ready to fold up and glue.  


Fold the sides in, the shorter side on top and then the bottom.  For the rustic white packet, I placed two seed packets in a glassine bag, folded it over and clipped it to the back of the seed packet.  I printed the sentiment (also available to download) on vellum.


For the pink and blue packets, I also created a Welcome Little One tag to place inside. The tag is also available for download.

You can download the Little Lambs Eat Ivy seed packet HERE.  The "If Friends were Flowers sentiment and Welcome Little One tag can be downloaded HERE.  To download the lamb image (colored and/or black and white) visit Free Pretty Things for You.

So glad you stopped by and have a lovely week!


Monday, March 23, 2015

Easter: He Is Risen + Free Image


Keren (Free Pretty Things for You) has created a beautiful Easter image for you!  Actually, she has created three different versions of the cross: the one above, a yellow and a pink version.   You can see them below.

I printed the cross at about 4".  I wanted the butterfly wings to be a little larger so I printed it again at 6 3/4" and just used the wings of the butterfly.   I glued the larger wings right over the smaller ones.


The background embossing, beautiful die cut, and scalloped embossed border at the bottom are folders and dies from Anna Griffin's Lace Trimmings collection.  The entire collection is just lovely!

I wrapped a sentiment printed on vellum around the entire front.  If you would like a download of the sentiment, you can get it HERE.


All three images are available to download.  You can get the pink version by visiting Free Pretty Things for You.    To download the yellow version, click HERE.   And click HERE for the light blue.

Thank you for stopping by and have a wonderful week!

Monday, December 1, 2014

Visions of Sugarplums 2014 Day One


It's Visions of Sugarplums time!  So glad you're here!  Visions of Sugarplums comes from, of course, Clement Clarke Moore's A Visit from St. Nicholas (or The Night Before Christmas).  It's always been a favorite and when Lauren was little, we always read it before putting out Santa's cookies and milk. 

Visions of Sugarplums brings to mind all kinds of goodies that only come around once a year.  I can't believe this is the 4th annual Visions of Sugarplums.  Time sure flies when you're having fun!    Part of the fun is visiting all the blogs and all the giveaways.  More about that later.  Let's get right to the projects.  Today I've got a couple of cute treat packages and one fun ornament featuring Free Pretty Things for You and The Cutting Cafe.


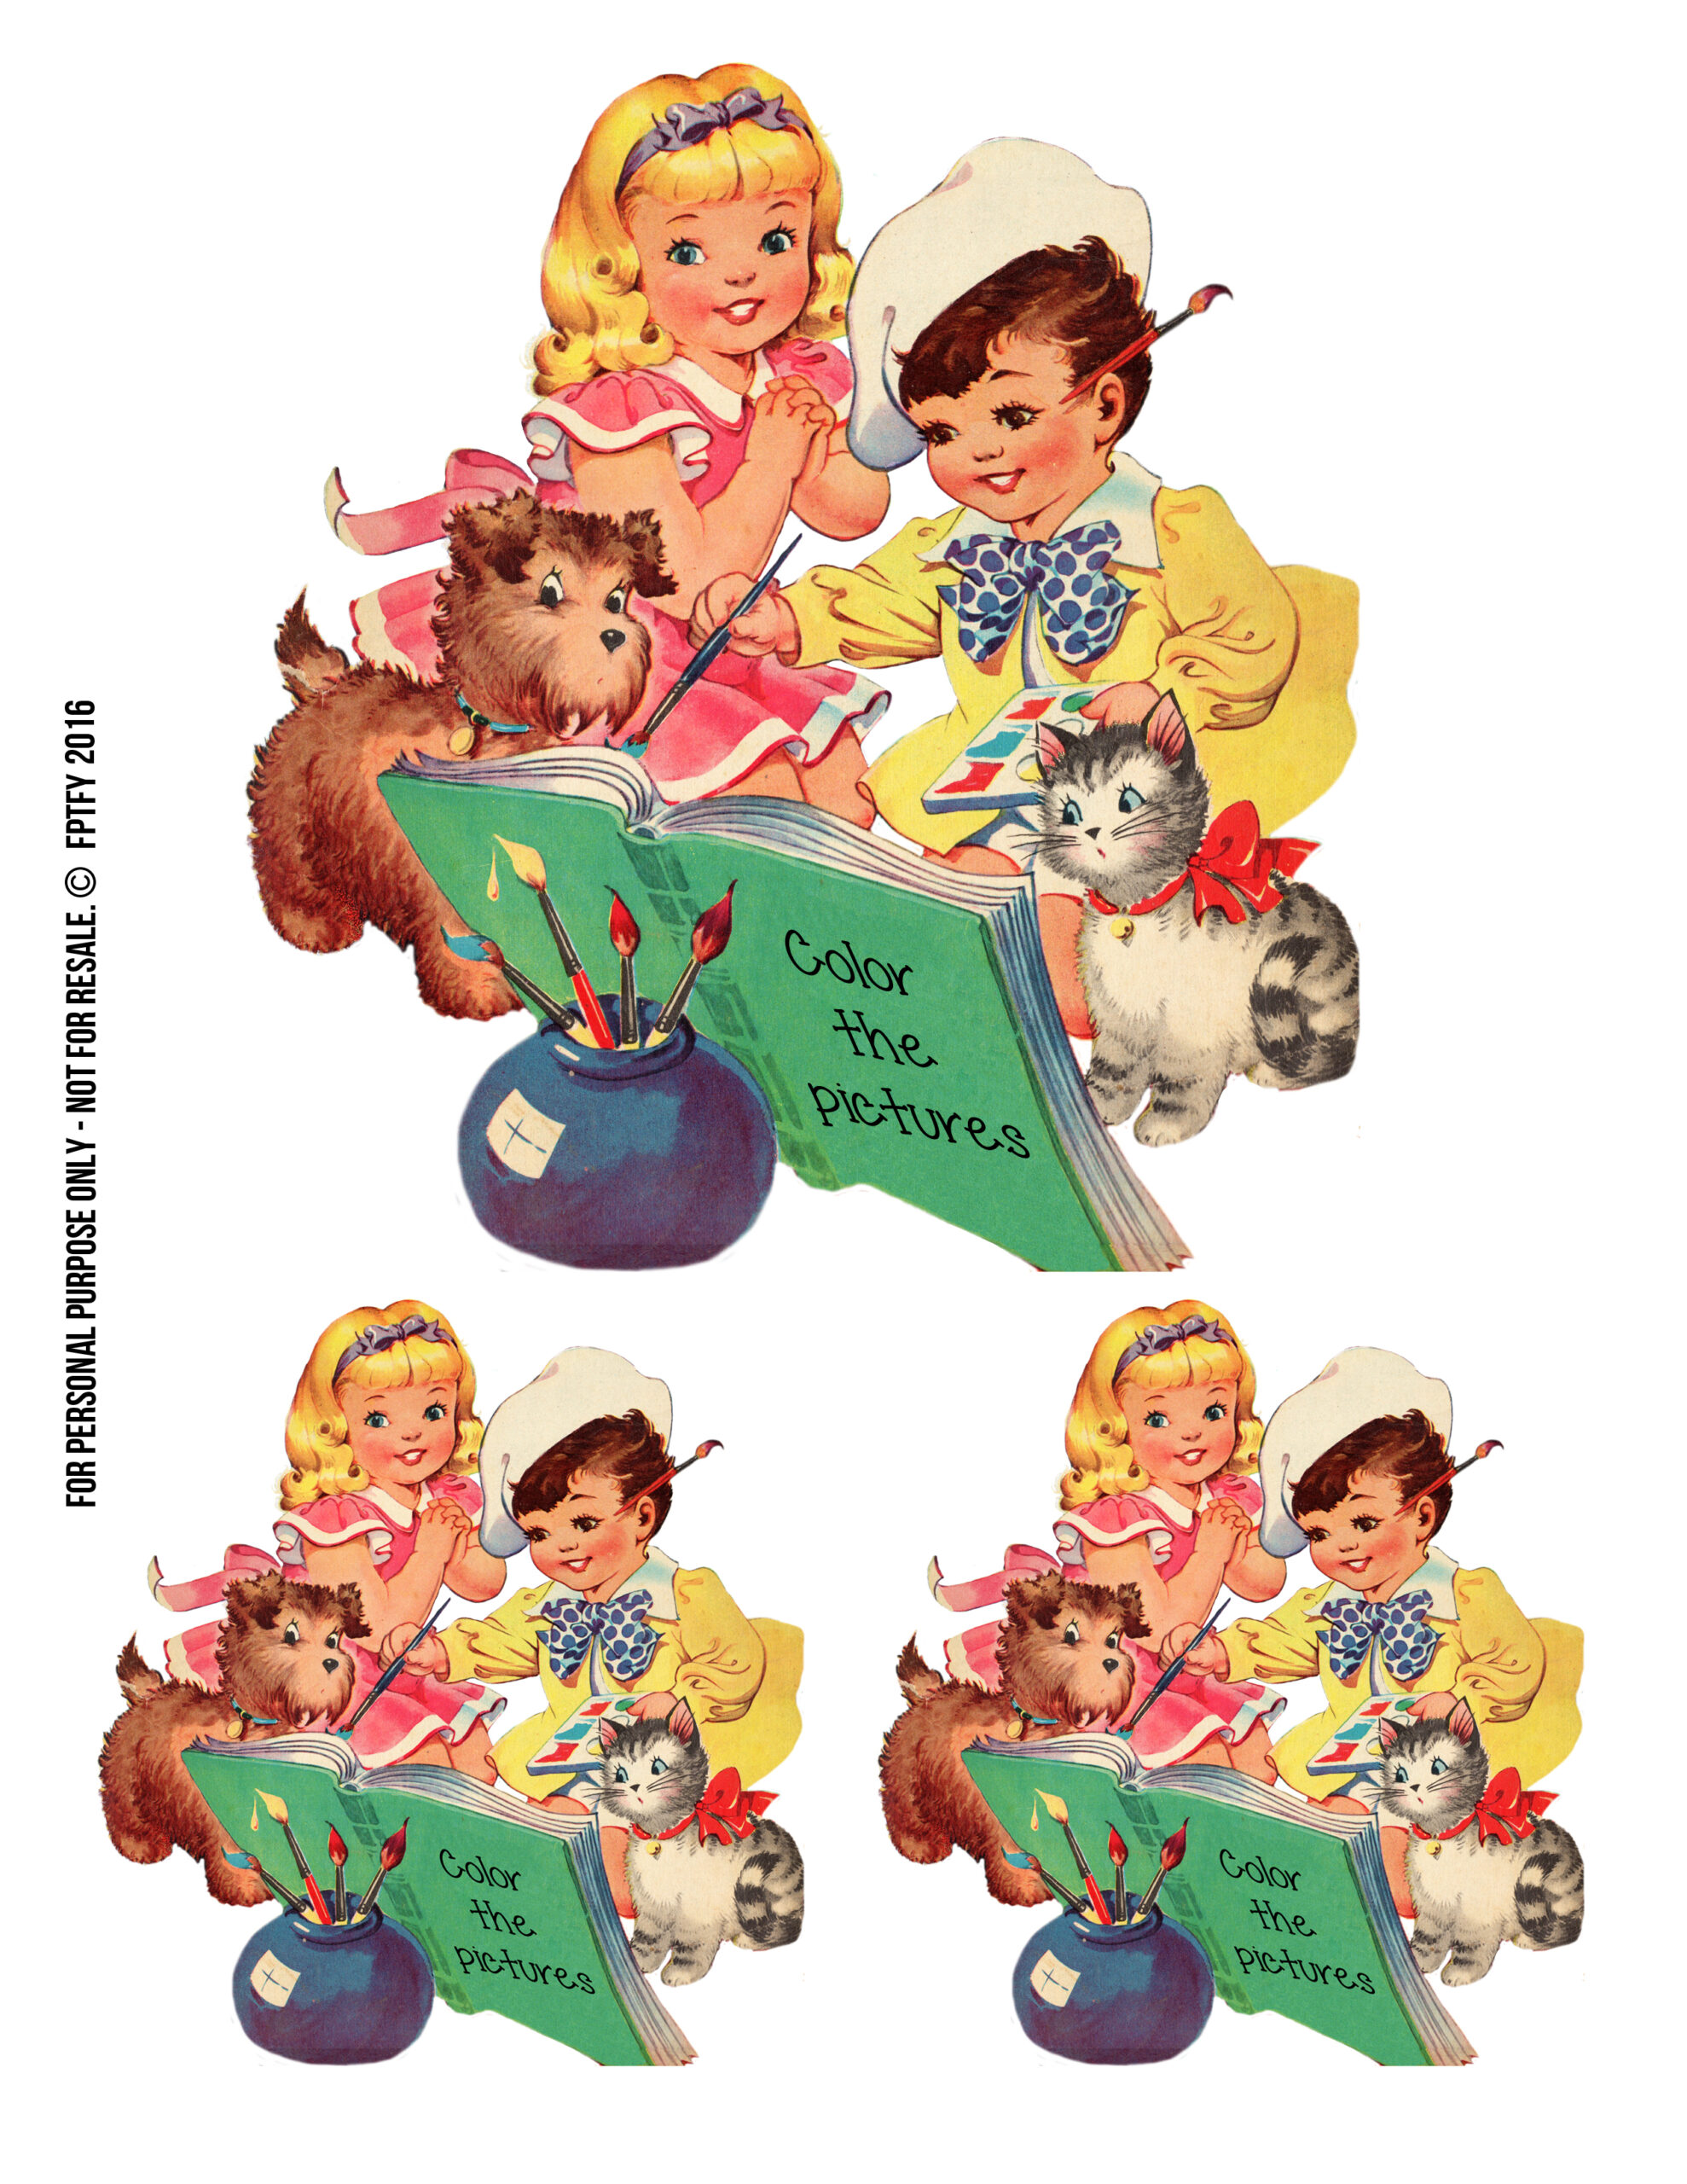
To kick things off, I've got a couple of sweet projects with a darling vintage Christmas image that Keren from Free Pretty Things for You and I are sharing with you.  Above I've used a gusseted pocket (that I really like) and you can see the measurements and instructions HERE.   The paper for this pocket is from Digital Work.  She is offering Visions of Sugarplums readers a 50% discount at her store.  Use code:  HOLIDAY50.  The discount is good through December 31st.  Thank you so much, Leska!


We also have the kids available with a snowflake background and I used it to make a dome shaker ornament.

It's quick and easy to put together.  Here's how:


I printed the image (on sturdy 110lb paper) so the circle would match the size of the dome (half an ornament).  Then I cut it with a scallop circle die.  I wanted the background to be glittery so I painted glue around the kids and sprinkled on the glitter.


Next, the I adhered the flag on the image making sure it was inside where the dome would 
need to sit.  The shaker goodies are a combination of snowflake and tree sequins, glitter and mica flakes.  I just piled it in the middle so it would also be out of the way.  I used Aleene's glue to secure the dome to the image.


Lastly I wrapped twine around the dome (used Aleene's for that too).  It is so cute - love those sweet kids bringing home their tree.  You can download both versions for free below.


ETA:  The link has changed as of 1-15-17.  Download the kids with blue circle background and kids only HERE.

Dropbox works seems to work differently for different people.  When image appears, click download button in top right corner.  If download button does not appear. right click on image and save as.  If neither method works, email me and I'll be happy to send you the image. 


I love PUTZ houses and have a couple of vintage ones.  I used them as my inspiration to make my pink and mint green Putz-like house.  I didn't want just a house though, I wanted a treat holder too. I used the 3D House from The Cutting Cafe.   Regina has taken part in Visions of Sugarplums from the beginning.  Be sure to check out the huge collection of cut files at The Cutting Cafe. Thank  you for your generosity, Regina!


I used the small house size (the files come in electronic cut file and pdf as well).  I die cut a star in the gable (one of my Putz houses has a star cut out).  Here you can see the side pieces already glued to the back.


Next I assembled the house and roof.  See notes on roof below.  


I wanted the roof to come off easily.  So I added a score on the opposite end of the roof exactly the same as the score on the left side.  I also added some scallops.  I covered the whole thing with a rectangle that is an 1 1/4" longer and 1/2" wider than the roof.   The tabs go down in the house.  

I had a white tree, but not a pink tree.  I wanted a pink tree.  So I remembered this tinsel glitter that  I have.  I wasn't sure it would work, but it made a really pretty pink tree!  I covered the tree in Elmer's and then sprinkled on the glitter.  Pretty in Pink!


I covered the whole entire thing in course glitter. 


Here you can see the lid off and candy inside.


Moonlighting by Mary - one digital set of your choice
Studio Shine Vintage - one digital set of your choice
Kitty Bee Designs - one digital design of your choice
Cameo Shoppe - 4X4 Christmas Cards
The Cutting Cafe -  3 sets of choice + 3D House

These are some of my favorite shops!  Thank you so much to all of them for participating in Visions of Sugarplums!

Lori's Day One Mini Giveaway:


Winners of these giveaways will be announced tomorrow.


In your comment, please let me know that you would like to win.  Comment here and then comment on all the participating blogs listed below.  Your name will go in a hat (or basket or bowl) for your comment here.  You will also get your name put in additional times for each comment left on the other blogs.  When the prizes for one day are won, those names are taken out, but all the other names stay in the hat.  

Be sure to check back daily to see if you have won!


The Mega Giveaway grows every day and the winner will be announced Saturday, December 6th.  Everything shown in this section every day will be a part of the Mega Giveaway.  Here is the first picture:


   Char
   Lisa
   Ira
   Sandy
   Regina

Have fun visiting these lovely ladies' blogs!  And a big thank you to them for participating in Visions of Sugarplums!

Come back tomorrow for lots more 
Visions of Sugarplums!


Related Posts with Thumbnails