Showing posts with label embellished envelope. Show all posts

Sunday, August 7, 2016

Baby is a Present Printable + Garden Notes Kit


Are you crafting today?  I've got a lot of things to do, but I'm quite successful at putting them off for crafting and reading.    


How about another baby printable - since I've got babies on the brain?  I've got this cute, sweet baby and the Oh,Baby tag for you.  You can download them below.  I used the image to make a shaker tag.  


I've got a new kit put together.   There is only a very limited number available.  Garden Notes Kit has one card and two embellished string-tie envelopes with tag inserts.


Love this kit!  Perfect for sending a little note to a friend and adding a little something extra in the string-tie envelopes.  

You can get the kit from my etsy store HERE.  

If you're local or international, email me.  

If you are a member of the Choux Box Kits Club, you should already have your email about Garden Notes.  (If you would like to be a member of the Choux Box Kits Club, click the tab at the top of blog.)


Download Baby is a Present HERE.

Dropbox seems to work differently for different people.  When image appears, wait a moment and a download button will appear in the top right corner.  If download button does not appear, right click on the image and save as.

Okay, here's to more crafting and reading - I'm getting right to it!


Wednesday, June 10, 2015

Diagonal Stripes + Tags Download


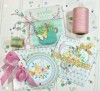
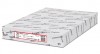
This card and embellished envelope are made from the same paper!  I created a sheet of diagonal stripes in Printshop and printed it off to make the black and white envelope.  Then I printed another, photocopied it (has to be toner!) and foiled it with my Minc.  Pretty cool!


I love black and white!  A long time ago (maybe even before Lauren was born and she's 29), Dennis and I went to an open house.  The living room walls were painted a shiny black and all the trim was white.  It was GORGEOUS!  Every time I think about it, I think we need to do that!  It was so dramatic.  The black and white diagonal makes a dramatic backdrop for whatever you want to put on it.  It is sized to print on 8 1/2 x 11 paper.  I printed mine on 80lb cardstock.


You can download the black and white diagonal stripe HERE.


You can download the tag sentiments HERE.


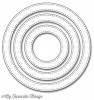
To turn the sentiments into tags:  Cut them to desired size.   You don't have to use a die to decorate the top, but I like how it looks.  To only use part of a die, be sure to not roll the bottom part of the die through your machine.  It doesn't cut, but it makes an indention.  Ask me how I know.  When I made this tag, not only did I do it once - I promptly went in there and rolled a second one all the way through!  You're looking at #3 in the pictures...

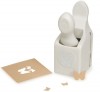
Here are instructions for the string tie envelope:


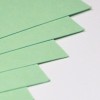
Cut the diagonal stripes to 8" x 8 1/2".  On the 8" side score as indicated.


Score as indicated on the 8 1/2" side.


Cut off the corners on the score marks.  Optional:  Round corners of top tab.

Fold in the side panels and glue.  Fold up the bottom tab and glue.


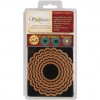
Get the buttons ready.  Thread buttons through holes and tie in a knot at the back,  If you would like an alternative to buttons, see THIS POST.  (You'll also see a different shaped envelope than this one.)


Add extra adhesive to the pop dot.  Don't count on just the sticky on the pop dot - it needs to be sturdier.  You could add Aleene's or hot glue.


And now on to the foiled diagonal stripes!


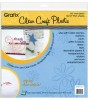
I have a tip for the Minc if you're going to foil the diagonal stripes.  I tend to get best results when I run it through the Minc twice.  The gold butterfly is actually cut from a piece of gold foiled crescent board that we carry in the store.  It's just wonderful!   


Just sold out of all the July 4th kits - thank you, kit club members!  Watch for a new mega kit coming soon:  It's All About the Gold - filled with gold goodies for your creations!  If you would like to join the Choux Box Kits Club, click on the link at the top of my blog and fill out the form.  You'll get an email newsletter when new kits are available.

So glad you stopped by!


Wednesday, April 29, 2015

Free Agnes Richardson Image!


Got cuteness?  I do and I'm sharing it with you!  You know I love Agnes Richardson illustrations.  


I've got a new one and it even includes my favorite:  a black cat!  You can download this image HERE.


I want to share this photo of my sweet Kitty.  He is 15 years old. He adopted us when he was about one.  Look at his pretty green eyes.  Dennis says he is just an old black cat and acts like he's not that fond of Kitty.  But I've caught him talking to Kitty and he doesn't push him off the couch if Kitty decides to keep Dennis company.  It's amazing how much I love this old black cat!


This cute envelope and tag are purr-fect (couldn't resist) for a little note to a good friend.  I adore this string tie envelope with all the stars.  I adore it even more with the Agnes Richardson cuties!

I'm just about ready to send out info on new limited Choux Box kits.  (This will be one of them.)  If you would like to get an email showing all the new kits, take a look at the Choux Box Kits Page.  You can sign up there.

Have a purr-fect (oops,there I go again) rest of your week!


Friday, November 14, 2014

Be Unique (String Tie Envelope w/ Alternate Ties)

My daughter and I have talked often over the years about being unique and being authentic.  I've always wanted Lauren to be comfortable just being her.   Sometimes it's hard in this world where we are pressured to conform.  


Lauren and I are hard on ourselves.  As I've gotten older, I have an easier time letting the perfect go.  I still have to remind myself sometimes that "as good as I can do it" is perfectly fine!  That's one of the reasons I LOVE this sentiment.  


And look at this darling Flamingo!  Cute, right?  The stamps and dies are from Reverse Confetti.

I love string tie envelopes, but sometimes I just don't want to set eyelets.  So I've got an alternative way to do the ties that I pretty much use all the time.


I use circles and pop dots.  Just cut four circles (larger than your pop dot).  The twine will be glued under only one of the dots.  Don't cut the twine yet!


I like the twine to start on the top dot.  It's important that the twine be pointing down toward where it will wrap.  Glue the pop dots on top of the circles.


Finish off with the other two pop dots.  I put a little dot of glue on the top and bottom of the pop dot - just to give a little more stick-to-it-ness. Wrap the twine around the pop dots and when you know for sure how much you need, then you can cut the twine.  That way you ensure that you always have enough!

I promise the twine doesn't stick to the pop dots - or at least it hasn't so far!  It works really well.  

Here are the measurements and instructions for this size envelope:


Cut your paper to 6 1/4 x 7 3/8".  I printed my paper double sided on 80lb paper.  This pretty paper is from Grepic and is included in a set called Cupcakes.  

Cut off the tabs you've created with the 3/4" scores above and below the horizontal score lines.  You will have tabs on just the middle section.

Then as you can see one picture up, I used a decorative edge die on the top portion.  Fold up the bottom and adhere to the tabs.  


So what do you think about uniqueness?  Wouldn't it be lovely if we could all live with this philosophy?

Hope your day is as fabulous as you are!

Don't forget to mark you calendar for Visions of Sugarplums!


Related Posts with Thumbnails